This Monday, January 23rd, started the first day of Chinese New Year, the year of the dragon.
Celebrations for Chinese New Year typically last for two weeks, so we will be studying and celebrating for many days to come.
As it is the year of the dragon, we talked about what that means. We talked about how in Chinese culture the dragon is a sign of good luck, power and prosperity, all very good things for people.
They seemed to have mix feelings about the Chinese paintings of dragons that I showed them, saying they look "mean." This led us into a discussion of why Chinese New Year is celebrated. One story says that a monster named Nien terrorized the people, and so they lit firecrackers and hung red banners to scare Nien away. It worked, and to this day, this is a time of celebration.
We said perhaps the dragons look mean to scare Nien away.
We started off the celebrations by making fortune cookies and cherry blossom tree ink paintings.
We have also been learning a Chinese New Year song and made firecrackers with chime bells so that our firecrackers made some kind of noise. This was nice because one of the boys (MK) pointed out that when he is in his room sometimes he gets scared, so we talked about him clapping of shaking his firecracker to make noise and scare the feeling away, just like Nien.
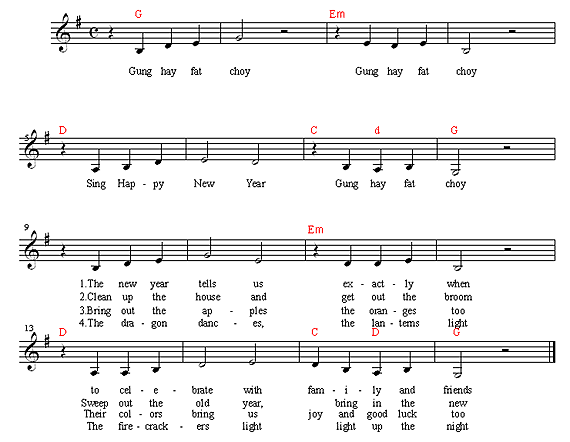
Play this link if you would like to hear the song we have been learning this week as you browse this post. " Gung Hay Fat Choy" -wishing you good fortune and happiness, by Nancy Stewart
http://www.nancymusic.com/Gunghayplay.htm
Here is our journey into making fortune cookies
I found this recipe on the Internet and don't remember the site to give credit
(sorry to someone out there)
One of the fun things about this project is that I asked the children what they wanted to say on their fortunes. I received comments like "I love you," "I love Baba," "Sheep walk on their legs." (this last one seemed to be a secret metaphor:)
Fortune cookies can be tricky to make - it's important to make sure that the cookie batter is spread out evenly on the baking sheet. Instead of using the back of a wooden spoon to spread the batter, it's better to gently tilt the baking sheet back and forth as needed. Wearing cotton gloves makes it easier to handle and shape the hot cookies. This fortune cookie recipe makes about 10 cookies.
Prep Time: 15 minutes Cook Time: 15 minutes
Ingredients:
· 2 large egg whites
1/2 teaspoon pure vanilla extract
1/2 teaspoon pure almond extract
3 tablespoons vegetable oil
8 tablespoons all-purpose flour
1 1/2 teaspoons cornstarch
1/4 teaspoon salt
8 tablespoons granulated sugar
3 teaspoons water
1. Write fortunes on pieces of paper that are 3 1/2 inches long and 1/2 inch wide. Preheat oven to 300 degrees Fahrenheit. Grease 2 9-X-13 inch baking sheets.
2. In a medium bowl, lightly beat the egg white, vanilla extract, almond extract and vegetable oil until frothy, but not stiff.
3. Sift the flour, cornstarch, salt and sugar into a separate bowl. Stir the water into the flour mixture.
4. Add the flour into the egg white mixture and stir until you have a smooth batter. The batter should not be runny, but should drop easily off a wooden spoon.
5. Place level tablespoons of batter onto the cookie sheet, spacing them at least 3 inches apart. Gently tilt the baking sheet back and forth and from side to side so that each tablespoon of batter forms into a circle 4 inches in diameter.
6. Bake until the outer 1/2-inch of each cookie turns golden brown and they are easy to remove from the baking sheet with a spatula (14 - 15 minutes).
7. Working quickly, remove the cookie with a spatula and flip it over in your hand. Place a fortune in the middle of a cookie. To form the fortune cookie shape, fold the cookie in half, then gently pull the edges downward over the rim of a glass, wooden spoon or the edge of a muffin tin. Place the finished cookie in the cup of the muffin tin so that it keeps its shape. Continue with the rest of the cookies.
placing the fortune in.
After this we folded it quickly and then pinched it into shape. This required more of me and less of the children because it was hot. If you let it cool too much it will just break.
Also, the direction say to use cotton gloves, but we just scooped it onto a cloth napkin
After you shape them place them in a muffin tin so that it holds the shape as it cools and hardens
Yum!
Cheery Blossom Sumi-e' Ink Paintings
We have been experimenting with ink for a while now at school, and one of our favorite things is to make the ink ourselves using the grinding stone and an ink stick. If you look at past projects under "working with ink" you can see some of our earlier explorations.
Many of our paintings from our ink experiments have been very abstract, but after showing the kids some Sumi-e' cheery blossom paintings, we attempted making them. The results were charming. Sumi-e' is actually a Japanese ink painting style, however it originated from China, so I thought it would be nice to have it a part of our celebration.
We used the ink the children made, and then had the cherry blossoms painted on using pink tempera and popcorn as our utensil, it worked great!
Cherry Blossoms are a symbol of Good Luck
Preparing the ink
A beautiful start
Using the popcorn to paint cherry blossoms
Chinese Firecracker-Chime
Here is a picture of a couple of them grouped together, but they are actually individual fire crackers.
In some ways they do not look very much like a firecracker (these are 3 and 4 year olds after all), but we wanted to make ours so that they made a noise, maybe not a loud noise, but I much prefer the soft chime of these.
Here is a picture of a more traditional celebration firecracker
we started by cutting up paper towel rolls and painting them red
As the tubes dried, the kids began their beading
They also painted Popsicle sticks gold, which we first placed through one hole
after that we threaded the bead work through the bottom of the tube and then tied it to the center of the stick before pushing it through the second opening in the tube.
This is the finished project
Here is the sweet little song we have been learning
This is from Nancy Stewart's website
www.nancymusic.com